To install the Arctic Liquid Freezer II on an AM4 socket, first attach the backplate, then secure the cooler. Follow the included manual for detailed steps.
The Arctic Liquid Freezer II is a popular choice for cooling AMD’s AM4 socket processors. Known for its efficiency and quiet operation, this liquid cooler offers excellent thermal performance. It comes with a comprehensive installation guide, ensuring a smooth setup.
With its robust design and advanced technology, it effectively reduces CPU temperatures, enhancing overall system performance. The cooler also features a sleek, modern look, making it a great addition to any build. Whether you’re a gamer or a professional, the Arctic Liquid Freezer II is an excellent investment for maintaining optimal CPU temperatures.
Preparing For Installation
Open the box carefully. Find the cooler, mounting brackets, screws, and instruction manual. Make sure all items are present. Place components on a clean surface. Organize them for easy access. Check for any damage or missing parts.
Turn off your computer. Unplug it from the power source. Ensure your hands are dry. Static electricity can harm components. Wear an anti-static wrist strap. Ground yourself before touching parts. Handle the cooler with care. Avoid touching the thermal paste.
Removing Old Cooler
First, shut down your PC. Unplug it from the power source. Place a towel under the PC. This prevents any spills. Locate the drain valve on the cooler. Open it carefully. Let the liquid drain fully. Use a container to catch the liquid. Ensure no liquid remains in the system. Close the valve tightly after draining. Dispose of the liquid properly.
Power off and unplug your PC. Unscrew the cooler from the motherboard. Disconnect the fan cables. Lift the cooler gently. Avoid damaging any components. Clean the old thermal paste from the CPU. Use isopropyl alcohol for this task. Ensure the surface is clean and smooth.
Mounting The Backplate
Choose the correct screws for the backplate. Use the screws provided in the package. Check the manual for the right size. Incorrect screws can damage your motherboard. Place the screws aside once chosen. Keep them handy for the next steps.
Position the backplate behind the motherboard. Align the holes with the sockets. Insert the screws through the holes. Tighten each screw securely but not too tight. This avoids damage. Ensure the backplate sits flush with the motherboard.
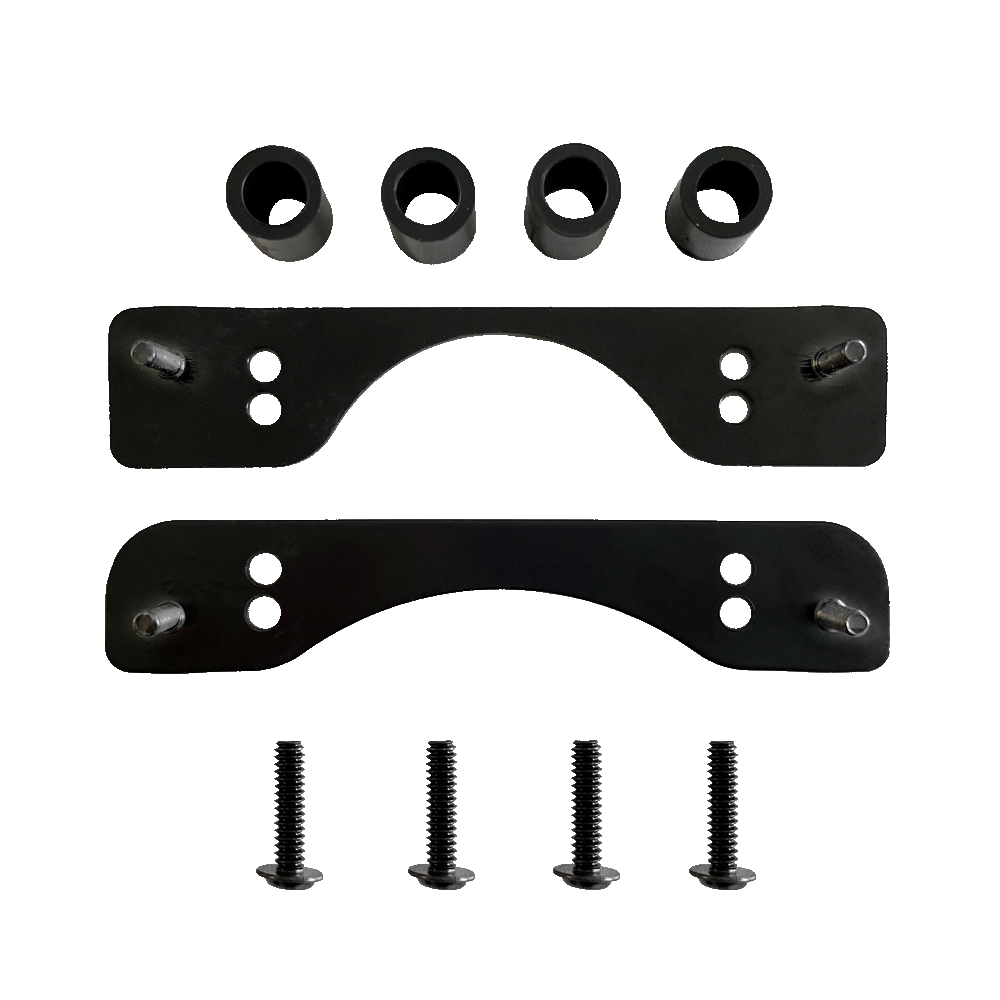
Credit: www.arctic.de
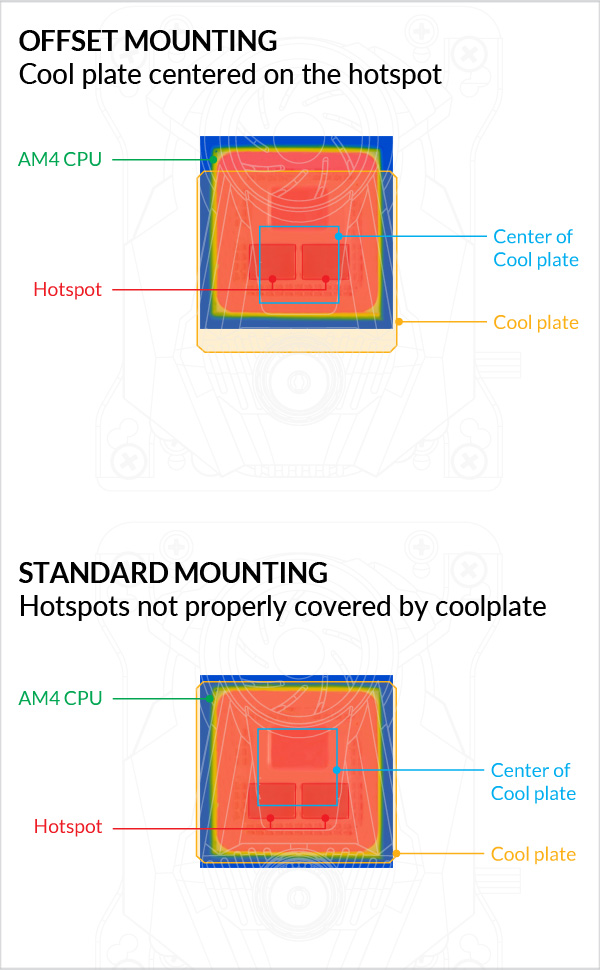
Installing The Pump Block
Ensure the CPU surface is clean. Apply a small dot of thermal paste in the center. The dot should be pea-sized. Avoid using too much paste. Spread it evenly using a plastic card or the block itself.
Align the pump block with the CPU. Secure it gently on top. Fasten the screws diagonally to ensure even pressure. Tighten each screw a bit at a time. Make sure the block sits flush with the CPU surface. Double-check all connections. Ensure the cables are properly routed. This helps to maintain a neat installation.
Positioning The Radiator
Top mounting the radiator can help with better airflow and cooling. It often works best in cases with good top ventilation. Front mounting may offer easier installation. It can sometimes provide better aesthetics for your build. Both methods are effective but depend on your case design. Always check your case’s compatibility before deciding.
Use the provided screws to secure the radiator firmly. Make sure it is not loose to avoid any noise or damage. Place the screws evenly across the radiator for balanced support. Ensure the fans are properly aligned with the radiator. Double-check all connections for stability and safety.
Connecting The Fans
The Arctic Liquid Freezer II AM4 offers several fan configuration options. You can use a push setup, a pull setup, or a push-pull setup. In a push setup, fans push air through the radiator. In a pull setup, fans pull air through the radiator. A push-pull setup uses fans on both sides of the radiator. Choose the configuration that best fits your case and cooling needs.
Good cable management is important for airflow and aesthetics. Route the cables behind the motherboard tray. Use cable ties to keep cables neat and tidy. Avoid clutter to keep the inside of your case clean. Make sure all cables are connected securely. Check that no cables are blocking the fans. Proper wiring and cable management ensure your system runs efficiently.
Final Checks
Make sure the cooler is touching the CPU. No gaps should be visible. Tighten all screws evenly. Use a crisscross pattern for best results. Check for any loose parts. The cooler should not move. Ensure thermal paste covers the CPU surface. A thin layer works best.
Connect the cooler to the power supply. Turn on your computer. Watch the fan and pump. They should run smoothly. No unusual noises should come from them. Monitor the CPU temperature. It should stay low. Check for any leaks around the cooler. Everything should stay dry.
Credit: support.arctic.de
Troubleshooting Tips
Pump noise can be a problem. Check if the pump is tight. Loose pumps make noise. Cooling problems happen if the fans are blocked. Make sure nothing is in the way. Leaks might occur if the seals are bad. Replace any bad seals.
Seek help if the pump stops completely. This is serious. Water leaks from the cooler need expert care. Strange noises that don’t stop are a sign. Professionals know what to do.
Maintenance
Clean the radiator to keep it working well. Use a soft brush to remove dust. A can of compressed air also helps. Blow air through the radiator fins. This keeps airflow good. Clean it every few months. It helps the system stay cool.
Replace the thermal paste for better cooling. First, remove the old paste. Use a soft cloth with isopropyl alcohol. Gently wipe away the paste. Apply a small amount of new thermal paste. Spread it evenly on the CPU. Be careful to use just a thin layer. This helps the cooler work best.
Credit: www.youtube.com
Frequently Asked Questions
Is Arctic Liquid Freezer Ii Compatible With Am5?
Yes, Arctic Liquid Freezer II is compatible with AM5 sockets. It offers excellent cooling for AMD’s latest processors.
What Size Screws Are In The Arctic Freezer Ii?
The Arctic Freezer II uses M3 x 5mm screws. These are standard for mounting the cooler. Ensure compatibility with your components.
Is Arctic Liquid Freezer Ii Compatible?
Yes, the Arctic Liquid Freezer II is compatible with most modern CPU sockets. Check your motherboard’s specifications for exact compatibility.
Can You Refill Arctic Liquid Freezer Ii?
No, you cannot refill the Arctic Liquid Freezer II. It is a closed-loop cooler designed for maintenance-free operation.
Conclusion
Installing the Arctic Liquid Freezer II AM4 is straightforward and efficient. This cooler ensures optimal performance and quiet operation. Follow our guide for an easy setup. Enjoy improved cooling and enhanced system stability. Make sure to maintain your cooler for lasting performance.
Thank you for reading our installation guide.